Tuesday 30 April 2013

I'm a busy blogger! (That's what you all are thinking)

A general comment on me for a change.

Those of you that follow my blogs are thinking I'm sure, "Gosh she does a lot of posts".
Well, you are correct. I come on here most days and am addicted to challenges and scrapbooking.
I have a scrap room set up, so can walk into it each morning and play.
I usually start the day with a card. I've found doing card challenges uses up all those scraps and embellishments that sometimes you don't/can't use on layouts.
I keep a basket of offcuts on my desk and dive into those for my cards.

As I now have 100 followers there is a giveaway coming up in a couple of weeks.
I am almost up to 1000 posts too.

Unscripted sketches #208
Here is the sketch
US_Sketch208and what a great one for using up scraps!

I've found a strip from  paper to run along the bottom. I've used both sides of another scrap, a co-ordinating scrap plus some washi tape. I've finished this one off with a Memory Maze "love" word left raw to contrast.

While you are reading, hop over to my challenge blog Archiscraps where you can see the May challenge.We would love to see an entry from you there.

Spring card at The Shabby Tea Room


Here is the picture of spring blooms at The Shabby Tea Room.
Our task was to create a card featuring these colours and to include flowers, lace and ribbon.
Here's my effort.
I've used a scrap of aqua ribbon resembling a tape measure, some aqua lace and an edging from Kaisercraft's Sweet Nothing collection. I fussy cut around a floral motif and added a punched tag with a word saying 'timeless". I'm thinking it could be a birthday card for a lady who doesn't want to disclose her age.(Isn't that all of us???)

Monday 29 April 2013

123 challenge

The end of the month is approaching quickly.
I have rediscovered 123 challenge which I used to do regularly.
Here is this month's requirements.


I've used a plaid (Argyle) pattern from all my memories containing the colour. It was whitewashed with paint.
Next I've matted using a variety of duck egg blue scraps. I've used memory maze chicken wire to outline the photo. This was also whitewashed,then cut to fit.
Washi tape and other embellishments are added.
My scanner or my eyes are still tilting the RHS of this stitched layout. It is straight in real life!

Sunday 28 April 2013

Round and Round at Ruby's rainbow and Steampunk at Tuesday Taggers

The theme at Ruby's Rainbow is Round and Round.
This is a site where you can upload cards, layouts, tags , whatever.
http://rubysrainbow.blogspot.com.au/
Here is the link.

I've chosen a layout about a ride at the Sydney Royal Easter Show. It made my head spin watching the kids on the ride. Goodness knows what it did to them.
I've gone a little "mixed media" with this as I still have elements from the wonderful Finnabair day.

As many of them were round, I used them.
As you can see I've misted through a spotty prima mask, then using the same mask applied gesso in another area.
Then I've stamped using cogs from my favourite 7 gypsies "Steampunk" stamps.
After that dried, I began gluing metallic on to the page. Most of these are circular in shape eg the bottlecap, washer, flower, eyelets etc.
I've also added round epoxy dots and a chain with bronze brads,as well as my journaling circle.
Here's a close up
 
Next I've made a tag using similar elements for Tuesday Taggers
The theme there is "steampunk"
I started with a white tag and used distress ink in "old paper" colour as my background.
Then I stamped the same cog image from 7 gypsies.
I've glued metallic elements plus a wooden cog from Prima and some epoxy dots.
I inked around the edges of the tag in black and added a leather tie. Finally, I've added a little turquoise misting.
 
Here's the finished item

Seize the birthday #15 Masculine card


Here's the sketch for Seize the birthday #15  and this week it is a masculine card.
My card started with an Echo Park strip of neck ties which luckily, stretched to make 3 strips on my card.
In between I've used red cardstock. The green strip at the end is also Echo Park.
 Then I used a pale silver circular border around co-ordinating lime paper on to which I've stamped the sentiment.
My finishing touch is 3 red buttons handstitched with co-ordinating embroidery cotton.
This card will most probably be used for my nephew who turns 39 soon.

Saturday 27 April 2013

Just like clockwork at The Colour room

The colour palette at The Colour room is stucco,marble grey,brown and lemon.
This means lots of neutrals with an occasional pop of colour.
I started my layout with a MEMORY MAZE cog corner. It has been painted white.

 I also own a cog mask so painted through it, using the same white paint.
The photo of me I have used before but it is a good one to show my thoughts. The cogs represent what goes on in my brain.
Most people would describe me as being highly organised. I'm always on time with whatever I do and can achieve most things if I put my mind to it. It has been said "You're just like clockwork!"
That is where the idea for the layout came from.
I've also used tags from Fundamentals, Elle's studio and October Afternoon plus Co-ordinations grid with twine wound around it, a felt handbag, a metal window over a yellow butterfly and some brads featuring cogs. It is a textural layout in real life!

Inkspirational #17

Another card site I visit is Inkspirational. This week they have a sketch challenge for cards

And the card I've made is very girly!
A friend has just had a baby granddaughter.
I used a canvas blossom which I inked with pink and then a purplish pink(Fuschia) colour. This was backed with adhesive backed mesh to resemble a trellis. I've embellished my flower and sentiment with pink pearls for a touch of bling!!!

Friday 26 April 2013

Case this sketch #25


Here's the sketch this week.
I've chosen a bright lime green cardstock, but then used "Sweet Nothings" papers again. My sentiment is in lime green/blue combo to stand out against the pastel background.For a baby card it has the softness plus a twist of modern as well.
 
Continuing on from before ,I have created a 2nd card using Kaisercraft Konstruct range.
I've turned this one sideways with the robots along the bottom.
While I was there I made an extra 4 cards which I'm sure will come in handy somewhere.


Flutterby Wednesday #237

Hi all, Here's the sketch for this week's Flutterby Wednesday #237
And here's my card.I've used a birdcage shape where the circle is,mainly because it featured butterflies.
The paper is from Kaisercraft's Sweet Nothing's range.
The silver card has now been trimmed to be equal all the way around.
 

Thursday 25 April 2013

Sketch challenge at Counterfeit KIt.

Challenge #5 at Counterfeit kit is a sketch challenge.
I've used all the green papers and card from my kit.
The photos are of a building at Hill End NSW,I think it was  a church . The painting on the left is by Russell Drysdale, one of Australia's famous artists. And the middle photo shows the original from the same viewpoint.

The background paper is Cosmo Cricket "The boyfriend" and the people one is Sandy Lion. The majority of the chipboard is Bella. There is also washi tape under the photos.


Wednesday 24 April 2013

A paper bag mini album

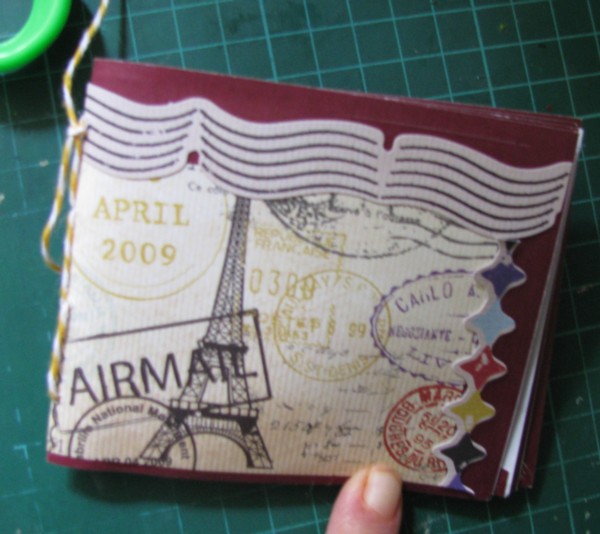
Here's the front cover of a mini album I made recently using KAISERCRAFT Check -In papers etc.The step by step instructions are as follows.
1. First take 4 long paper bags.
You can use square but the finished album will be a different shape.

Mine were found in a motel bathroom (if you get my drift).Because the were maroon and quite thick I thought they might come in handy. They have.

2.Cover each side of all bags with patterned paper, vary to make it more colourful.Leave a tiny border around each, it looks nicer.

3.I've cut thumb grip holes in mine for easy sliding in & out of tags. I've found this works better.
You only need to do this on one side of the open end

Don't decorate the pages yet!

4.Next, fold each bag in half. Make sure that the one which will become the front cover has the opening on the right. Check they are all even.

5.Alternate openings right left, right left(Keep going if you have more pages.)

The one on the left is my cover, but tag thumb grip is on down side. The same with the 3rd one.

6.Lay one inside the other to form a "book".
You should have 2 pockets in the first half of the book, and 2 in the second half.

7.Now before assembling, but making sure the folds are obvious, decorate your pages.
Don't go right to the centre edge or fold line. This will be sewn eventually.

Here is my centre page.

You can see I've cut the photo slightly away from the fold line and the same with the rhinestones etc.

8.WHEN YOU HAVE DECORATED FRONT AND BACK OF ALL PAGES ,THEN STITCH THE FOLD.
Ensure your pages are the right way up.(This is why I waited to decorate my pages!)
I used twine and a darning needle and used a hole poker to pre-drill the holes before sewing.
You could try your sewing machine if it copes with heavy duty thicknesses, but these bags were too stiff.
9.Bring your ends through to the outside of the album and tie off. Leave ends long if you wish.
This could also be done with ribbon or wool if you wish.

10.Making 4 Tags.

11.Cover both sides with patterned paper.
12.Check which way they will be inserted into your pockets THEN add photos and labels
( but you could use them for journaling or inspirational words or die cuts)
13 Pierce a hole in each tag and add twine or wool or decorative braid or lace or ribbon.
These can be varied if you want it more colourful too.
14 Insert into album pockets and you are finished!!!!
Good Luck and if you want to leave a link in my comments section, I'd love to see your mini albums.


Monday 22 April 2013

Stuck?! April's 2nd sketch

Here is the 2nd sketch for April


and my interpretation of it.
The original colour photo was quite yellow but it hasn't come up too badly in black & white. My daughter used to love sitting on my lap and hearing stories or having conversations about imaginary things. She was full of wonder about life, fairies and all things magical.
I've used Kaisercraft Airy Fairy range "Whimsical" as it suits this situation. I had fun layering and adding buttons and brads.The lace is about 60 years old.

Sunday 21 April 2013

Shabby tea room.

I've made this card for the shabby tea room
http://theshabbytearoom.blogspot.com.au/
The inspiration picture featured a ladder with turquoise vases and a sprig of pink flowers.
I've gone with those 3 colours in a card. I used cut up crochet doileys ,dyed to a very soft turquoise tone,then added pink brads centres. The background paper features numbers. I always count as I go up a ladder. It is a hangover from childhood I guess!

Saturday 20 April 2013

Unscripted Sketches #169

And here's my slight twist on it.
If the lady with the umbrella replaces the square on the left, it is the same as the sketch. Hope you like it!

Stuck on U card sketches

If you are one of my blog followers and wondering why there is so many posts ,it is because I'm confined to the house for a few days. My doctor has told me to "rest up" and me being me, needs to do something so I'm crafting.
Here's the card sketch at Stuck on u.
And here's my interpretation.
The inner outlines are silver, not black. This matches the background card which is also silver.
I thought this would make a nice wedding anniversary card.
The word blossom on the sketch I took to mean the card needed a flower so I have complied.
I don't have a machine that cuts scallop edges, so I've fussy cut around a journaling  block from Kaisercraft here.

Stuck on u sketches using Counterfeit kit.

Here is the sketch for Stuck on u sketches

As you can see,it is a double.

Here's my interpretation.
I made a stupid mistake when doing this double. I thought I had 2 sheets of the check paper when it turned out to be one plus a part of one. So I've used pastel spots on the second. I can justify it in a way because our Physical culture uniforms had spotted collars.
Anyway despite this the 2 pages match.
The photos are dark because they were taken as slides back in 1959 and I've only recently had them made into prints.
Here are the pages separately so you can see the details better
 
I've used kaisercraft Tiger Lilly butterflies and flourishes as well as pearl flourishes in white.
The majority of what is on these layouts is from my counterfeit kit.
 

Friday 19 April 2013

Case this sketch #24

This weeks case this sketch looks like this

I chose to put my robots straight on to cardstock this time and they still dominate the card. I have followed the sketch. They're from Kaisercraft's Technologic.

Proud boys at Scrapfriends.


Here's a layout done for Scrapfriend's colour challenge. The colours were yellow, orange, blue, black and white.
I've used 2 Memory Maze chipboard "love" words. They, plus the background behind them,were altered by paint being dragged along with a credit card. I didn't fully mix the red & yellow paint so there are variations in the orange colour.
The background paper is Echo Park "All about a boy" and I was able to find the word that became my title...PROUD.The other black papers are both Kaisercraft and both relate to school with a ruler and alphabet.
The journaling tag is a newly acquired Elle's studio.

sketches with a twist

Here is this month's sketch
and here is my layout.
The flowers are die cuts from Grace Taylor. I layered them to give more depth.
I have also added arrows from Echo park, tags from 2 different manufacturers, washi tape and loads of gesso applied through my chicken wire mask. I have photographed rather than scanned this owing to a temperamental scanner.

Another freaking scrapping challenge April part 1.

This layout is for Another Freaking scrapping challenge's first challenge for April. The topic was to document your biggest challenge in life.
There's been a few:- motherhood, coping with a chronic disease(Rheumatoid Arthritis),divorce, building a house, marriage, studying....but I've chosen one dear to my heart...losing a baby .

This layout may not have the latest Prima flowers or beautifully matched embellishments, but the thoughts behind my journaling are as precious as possible. It is a "from the heart" layout. I've used lots of journaling, paper tearing (symbolic), and stamping using paint.

We were married for over 2 years trying to conceive for most of that, then finally it happened...I was pregnant. We were overjoyed! The trouble was at 12 weeks I miscarried.We were devastated, but philosophical. I figured if I could fall pregnant once, it could happen again.2 years later I fell pregnant again with Erica and everything went fine.

Another Freaking....book cover

I'm making a mini book for my sister for Mother's Day and this will be the front cover.
I've used the sketch from Another Freaking Scrapping Challenge as my impetus.
Here's the sketch

and here's my cover. It is 11cm x 14cm,so like an overgrown tag.
I've used a pennant instead of buttons and metal edges circular tags for my circles, with alphas stuck on top.
It is also elements from my Counterfeit Kit

Thursday 18 April 2013

Scrapping everyday miracles

I was clicking on my followers faces and seeing who they are. I came across Tracey Sabella and went to her blog. There is a link to a challenge site named  Scrapping Everyday Miracles.
The challenge there for April is to scrap any animal and use a quote.
So here's my layout.
I've used the quote "Everything has its beauty, but not everyone can see it" by Confucious.
On the layout I've painted a chipboard circle then used a stamp "remember this moment". I've fussy cut around the flowers and used antique lace along the bottom. Treasure is a rub on and Summer is a raised word that came with a set of die cuts.
I love giraffes and got close to this one at the zoo recently.

Flutterby Wednesday #236

Flutterby Wednesday has inspired me again.  I've used a Kaisercraft "Remember this moment" stamp on to Prima Paper. I have mounted it on white sparkly paper as my background. Then I used 3 Grace Taylor flowers in co-ordinating  colours and finally a butterfly on the biggest flower, which is also glittered around the edge.

Lollipop Ladies Moustache challenge.

From yesterday (Wednesday) for 2 weeks the challenge at The Lollipop Ladies is moustache lollipops.
The challenge entry must include something to do with facial hair ie a beard, moustache or eyebrows.
I've chosen to add a layout about my Christmas bon-bon prize. A plastic moustache! I've called my layout "My very black smile". I've used a recent sketch from Soul Scrappers I think it was.
The background paper is Kaisercraft "check-in" and the aqua spotted paper is EK success wedding paper named "I do". I misted through a Prima mask to hide the wedding words. The star paper and tabs were scraps. I've also used up alphas in the title on more scraps of paper. The tags are Kaisercraft "Loire valley" I think.
It was a fun layout to make and the photo recalls a happy memory!